Pages

Wednesday 28 February 2018

It's a Girl


Good Morning,

I hope everyone is doing OK today & that the snow isn't causing to many problems for everyone in the UK. We haven't really had any yet where I live but we are forecast some tomorrow so we will have to see.


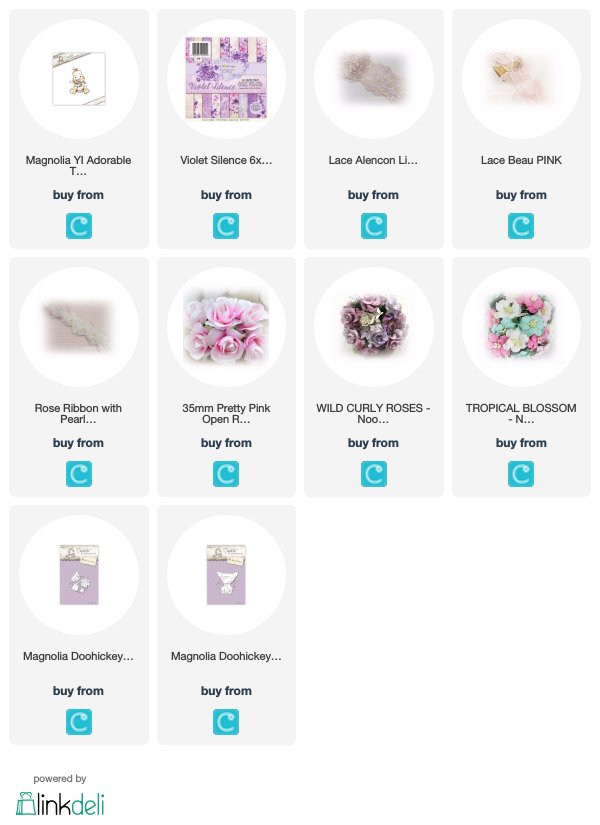
I have been playing with the Lemoncraft Violet Silence papers again, I'm not usually a pink person but I am loving all the pink & purples in this collection.


I have coloured up this super sweet Adorable Tilda stamp from the You are invited collection. I have also used the Doohickey Baby Accessories & Diaper dies.


I have used a 35mm Open Rose, a wild curly rose, a tropical blossom & my favourite thing at the moment a Bon Bon. I have added some stickles glitter to the flowers along with the little baby rattle & her hair bow.


Thank you for stopping by & pop back tomorrow for more gorgeous inspiration from the team.

Hugs

Emma xx


The products used can be ordered in the Noor! Design U.K. webshop:

Tuesday 27 February 2018

You Made It!

Hello everyone!!
I'm little late with today's post but I have to made a card for my son's friend.
And now I'm share it with you. 
For this card I used another one of my old Magnolia stamps... 


Edwin is coloured with Distress inks. Then I added some gesso all around the image and for finishing I distressed using walnut Distress ink pad.

Paper pads are from two different design collections.... Maja Design and Pion Design... all listed below my post.

 For the border on right side I used Joy Crafts No end Border Dies... Now on Sale!!! I love it sooo much! Hope you agree with me. LOL


I added also Tim Holtz Filmstrip and sentiment from Maja Design Denim & Friends collection.
Very simple card... Now is your turn to create. 
Pop over the shop chose your stamp and your embellishment!

Happy crafting!
Barbara GR

The products used can be ordered in the Noor! Design U.K. webshop:

Monday 26 February 2018

Decorated Biscuit Tin


Hello everyone.  I saved this biscuit tin from Christmas with decorating it in mind.  It was fun for sure and I love the result :)  Of course the papers used are by Pion Design, Our Furry Friends and Days Gone By collections.


Isn't the image just so adorable.  This is from the image sheet from the Our Furry Friends collection.

I added the new scalloped pearl with rhinestone trim to the top and bottom of the tin.

The image was layered onto a diecut from the LDRS Label set cut from Pion Palette White II and then edged with pearl trim.

Below is a side view.  I cut two strips from the a day to remember sheet and placed at the top and bottom.


This is the other side.  I added lace butterflies and lots of gorgeous embellishments, all listed below.


The light was reflecting a little too much on the top but you can see I added paper, pearl trim and a cut out butterfly from the borders sheet from the Days Gone By collection.

The leaves were cut using Palette Green III.


I hope you like it :)

Tracy xx


Sunday 25 February 2018

A card for a 40th birthday

Hello everyone!

A little ago I've been invited to a 40th birthday - and since this has passed now I can share the card I made for this occasion:


 Well, I think you agree with me that those days need to be celebrated. And it wouldn't be a celebreation without champagne. So I've decided to make a card in the shape of a champagne bottle. I've let my Cameo do the work with cutting this bottle... ;) Then I've covered it with designer's paper by Mintay and Lemoncraft.


I know, I've used Wine Tasting Tilda before - but she was just too perfect for my card to not use her. She was colored in with Copics again.


You wouldn't believe how many embellishments can be put on a card that is only 10 cm wide.

Under Tilda I've put two paper straws - I know, we've all been told to not drink alcohol with paper straws. But for decorations it just went too great with my theme...

Under the straws there is a flourish by Fantasy Dies and a branch, same brand.

I also wanted to add some flowers for a female touch. So I used one of the beautiful fabric flowers cut from the rose ribbon and put two of the open roses next to it.

Tilda is sitting on a die cut word "cheers" and I used a different flourish, also by Fantasy Dies, under it.

Oh well, and since we're all a bit mean I just had to include the age... ;) I've die cut the sign from the Glass and Signs DooHickey set, glued the die cut 40 onto it and then used a memo pin to adhere the sign to my card.


At the top of the bottle I had stamped and die cut a round "happy birthday" saying and used it as the label of my bottle. In the middle I've placed a punched out heart and wrapped some Baker's Twine around the bottle before glueing the saying down. Then I've added a few pearls here.

Have a happy day everyone!
Hugs, Kathrin

The products used can be ordered in the Noor! Design U.K. webshop:

Saturday 24 February 2018

Violets - tutorial

Hallo everyone!

 I have  a new tutorial  today. Spring is coming ( soon, I hope:))), I made some little violets for you.
Do you want to learn how I made them?

Let's start:

 I’m cutting some petals with Rosy Owl dies, the smallest of  them with white Iranian foamiran  and some leafs with olive Iranian foamiran


Now I'm colouring petals with oil pastels ( using 2-3 colours) and I’m touching to hot iron. 
I'm using quilting tool to form petals.


Now I'm using iron and mould to shape leafs


I'm colouring leafs with oil pastels....


........and a bit forming a tip of the leaf


I'm using glue gun to stick stamens to flowers and wire to leafs.
My flowers are ready, actually


Everything is clear? I hope, yes:)
What do you think about my spring, Easter composition?:)


See you, 
Beata:)))


The products used can be ordered in the Noor! Design U.K. webshop:


On boards


Hello!
Today I have for you a little card made from cute papers designed by Karola Witczak named Minaty Papers BIRDSONG.


I coloured all of the flowers with sprites, inks and gesso to get close to these glorious colours.
You have to judge how it came out :)


I wish you sunny weekend and a lot of fun!
Ewa


The products used can be ordered in the Noor! Design U.K. webshop:

>

Friday 23 February 2018

Lily Tutorial

Hi everyone!

I've been thinking over the last few days of what I can show you for a foamiran flower tutorial that would be both easy and attractive and here it is... I've created a beautiful lily foamiran flower tutorial for you!

Unlike most other flowers, the perennial Lily is never truly dormant!  The strength and beauty of  this international flower has cemented its place in the culture of the world. With such an elegant look no wonder the flower means royalty, rebirth and purity!


You will need :
✔ a piece of white Silk Suite foam
✔ a  square (5 cm x 5 cm) of olive green foamiran
✔ a strip (1.5 cm x 8 cm) of yellow foamiran
✔ two templates of petals with dimensions approx: 6 cm x 3 cm; 5 cm x 2.5 cm
✔ two oil pastels in desired colour  (I chose mauve and orange)
✔ scissors
✔ a ruler
✔ a hot glue gun
✔ a piece of kitchen sponge and 
✔ a toothpick

 All the items you can buy from https://www.crafteezee.co.uk/


From a piece of heavy card stock cut out 2 petals with dimensions: 6 cm x 3 cm (big); 5 cm x 2.5 cm (small).


Using the toothpick, trace the templates and cut 5 big and 5 small petals out of Silk Suite foam.


The next few steps show you how to colour the petals:
Rub the pastel on the piece of sponge. 
Fold the petal in half lengthwise, then colour the folded line with the sponge (pic.1).
Paint all the petals unilaterally (pic.2).
Apply a shade of the same colour across the all petal both sides (Pic. 3,4)


 As I mentioned previously, Silk Suite foam is a very flexible, soft and easy manipulative material so you don't need any iron!
Gently stretch the edge of the petal in opposite direction as shown in the picture below. When you finish they'll have a curly shape.


Next step is to prepare the stamen. You can make it from a strip of yellow foamiran (1.5 cm x 8 cm, approx).
Cut the strip at about 1 cm in short slits (pic. 1) and colour it along the cut edge on both sides (pic.2). Roll the cut strip and glue it with a hot glue gun (pic.3). Carefully approach the bundle of foamiran to the heated surface of the iron for a few seconds. Pull the stamen off and dishevel it.  Repeat everything again until achieving the desire shape (pic 5).


Now its time to assemble  the petals to the centerpiece. There are two layers of petals and we'll start with the smallest ones.  The picture below shows how to do it. Put little drops of glue and stick all the petals successively.   


Once you've stuck the first layer, you have to stick the second one with the big petals. Glue every big petal above the already glued small one as it's shown on the picture.


The last step of our lily creation is to cover the back side of the flower with a green sepal made out of olive green foamiran square (5 cm x 5 cm) . Heat and twist it in the way shown below and stick the calyx to the back side of the flower. 


Now its completely finished!  You can use it to decorate a scrapbook project or to make a stunning hair clip, headband or some other accessory. 


I hope you like my new tutorial!
Wishing you an amazing weekend fill with lots of new inspirations!

Hugs!
Elena xxx


The products used can be ordered in the Noor! Design U.K. webshop:

Thursday 22 February 2018

Summertime! I Wish!

I did want to have this ready for last week with Valentine's and all but I just couldn't get my flowers finished on time!!  Life!  It gets in the way of my crafting time!!  So annoying.  ha ha ha ha!  

I've used some gorgeous Maja Design papers that are still in the shop from the Summertime collection.  Sigh...I just love them!!!  I layered some lace but then when I was finished was thinking "OH MY! Where did my lace go?!!" LMBO!  Well, it is there and I've used Lace Daisy, Lace Winnie and get this LACE TILDA!!  hee hee!!  😊  Pretty appropriate since I have used Magnolia's Tilda w/Flower in her Pocket.  Don't forget to check out the selection of Magnolia's in stock and the newest collection "You are Invited".


These Foamiran flowers were made using Rosy Owls flower dies and leaves.  I figured out a new way of shaping them quite by accident.  ha ha ha!  Love that!  I also used a great variety of stamens, which maybe doesn't quite replicate anything real but it's FUN and pretty!!  


Here I've used one of the moulds in the shop just to press out a pattern to give it some foliage lines.  So cute!  I added a wax prima bow and a cute little gold tassel.


HOW ADORABLE IS THIS?!!!  So shiny and pretty!!!


Thanks for stopping by today!!

Enjoy the rest of your week, weekend and
I hope you find some crafty time!

Hugs!

The products used can be ordered in the Noor! Design U.K. webshop: